USB Device Upgrade(onebin)
1. Overview
1.1. Upgrade Method
-
USB device upgrade in blank flash mode
-
USB device upgrade in Uboot mode
-
USB device upgrade in Kernel mode(uvc mode)
-
USB device upgrade in Kernel mode(USB mode)
1.2. Test Environment
pcb: ssd212 demo board
Kernel config: pioneer3_spinand_defconfig
project config: dispcam_p3_spinand.glibc-9.1.0-s01a.64.qfn128.demo_defconfig
usbtool: usbdownloadtool 2.1
2. USB Device Upgrade in Blank Flash Mode
-
Scene
It is suitable for scenario where there are complete pcb and usb interfaces, but nandflash or norflash is empty.
-
Principle
-
Execute rom code before powering on IC.
-
Jump to nandflash/norflash to perform IPL according to the external HW config.
-
Without IPL, the system will automatically enter the ufu upgrade mode. Pre-load
u-boot.binthrough pc tool.
-
-
Requirement
The pre-loaded
u-boot.binhas ufu upgrade function. -
Step
-
uboot config
Rename the generated
u-boot_spinand.img.binoru-boot.img.bintou-boot.bin(only for blank boot). This file will be used in the following steps. -
Compile SDK to generate an image upgrade file.
-
Download the toolkit. (take nandflash as an example)
Use different toolkits to build different flash. (the corresponding SDK contains the upgrade tool)
SPINOR FLASH upgrade kit:
usbloadertool_onebin_spinor_20210104.rarSPINAND FLASH upgrade kit:
usbloadertool_onebin_spinand_20210104.rar.rarUnzip the corresponding toolkit to the image path.
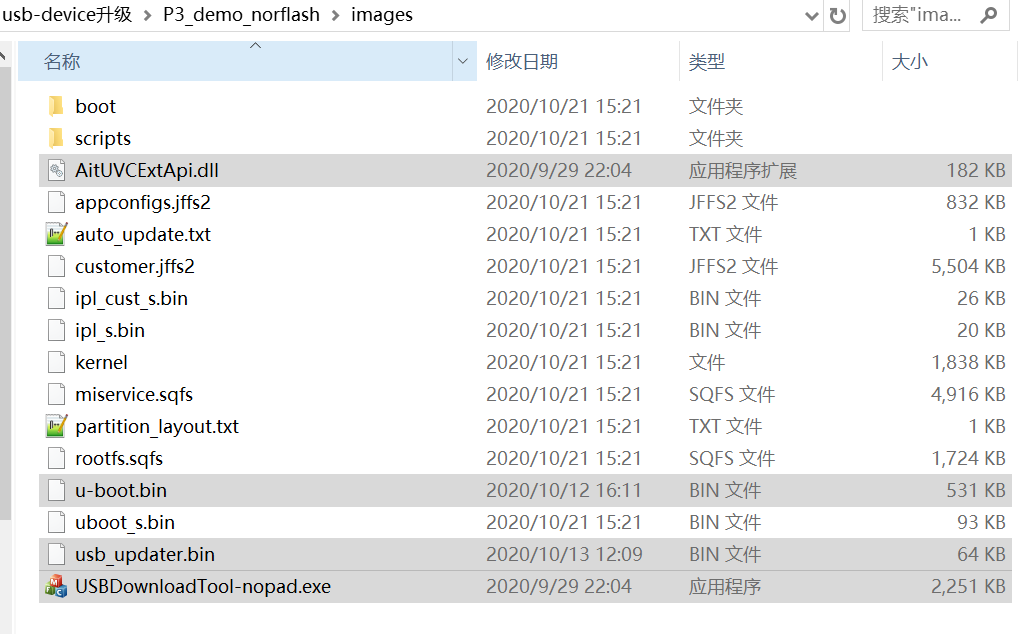
-
Replace the generated
u-boot.binhere. -
Power on in empty flash mode and connect to usb. There is an access storage device on PC.
-
Execute
USBDownloadTool-nopad.exe.
After the system is upgraded normally, the boot process can be viewed through the serial port.
-
3. USB Device Upgrade in Uboot Mode
-
Scene
It is suitable for scenario where there are complete pcb and usb interfaces to ensure that the system can enter uboot mode
-
Principle
There is an uboot in norflash or nandfash, which supports PC upgrade in device mode. Complete the download and upgrade by executing uboot and pc software to interact.
-
Requirement
uboot has ufu upgrade function.
-
Step
-
uboot config
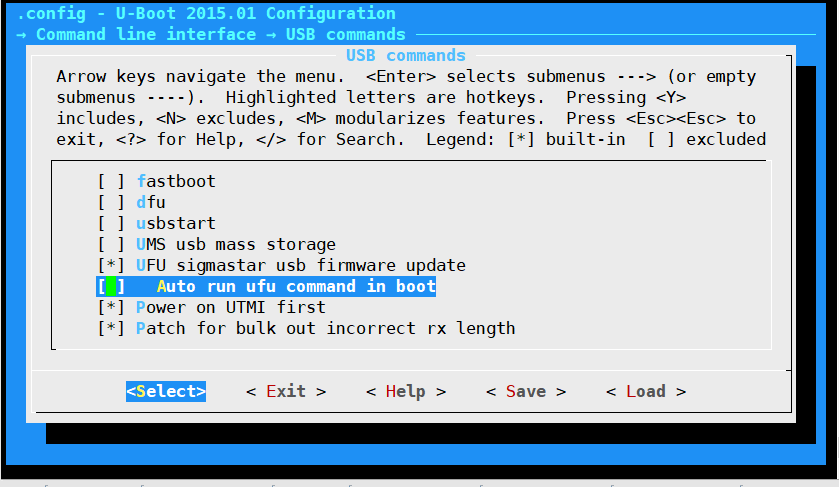
Support ufu upgrade, but disabled automatic operation.
-
Burn uboot with ufu upgrade function into flash.
To use the USB device upgrade function in uboot, you need to set the following parameters in the boot mode, and then you can enter the device upgrade mode after booting.
setenv ota_upgrade_status 1

saveenv
-
Download the toolkit. (take nandflash as an example)
Use different toolkits to build different flash. (the corresponding SDK contains the upgrade tool)
SPINOR FLASH upgrade kit:
usbloadertool_onebin_spinor_20210104.rarSPINAND FLASH upgrade kit:
usbloadertool_onebin_spinand_20210104.rar.rarUnzip the corresponding toolkit to the image path.
-
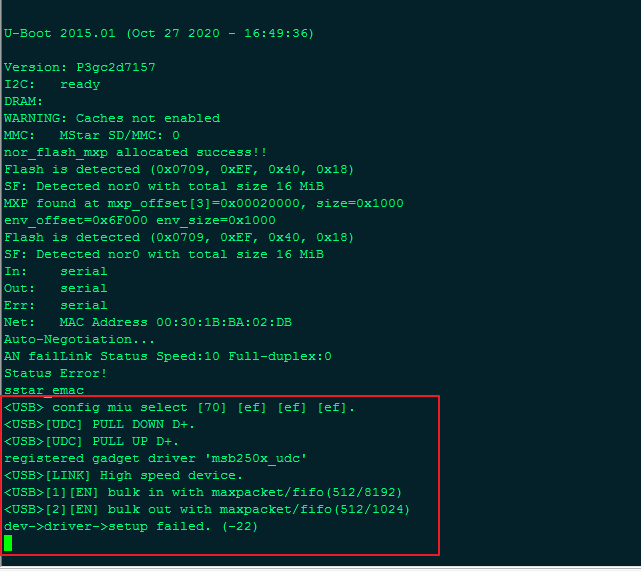
Reboot and enter the system, the display is as follows.
-
Execute
USBDownloadTool-nopad.exe.
-
4. USB Device Upgrade in Kernel Mode (UVC Mode)
-
Part
Kernel config and APP
-
Principle
-
Configure the uvc mode on the board.
-
Use pc tool to issue commands to the APP on the board.
-
Set the environment variables.
-
Use the ufu upgrade function in uboot to complete the upgrade.
To verify the usb upgrade in the kernel, first make sure that the usb device can be upgraded normally in uboot.
-
-
Requirement
0: uboot supports ufu upgrade. Refer to USB device upgrade in Uboot mode
1: Kernel configure uvc mode
2: Need mi_uvc application
3: USBDownloadTool upgraded to V2.1.
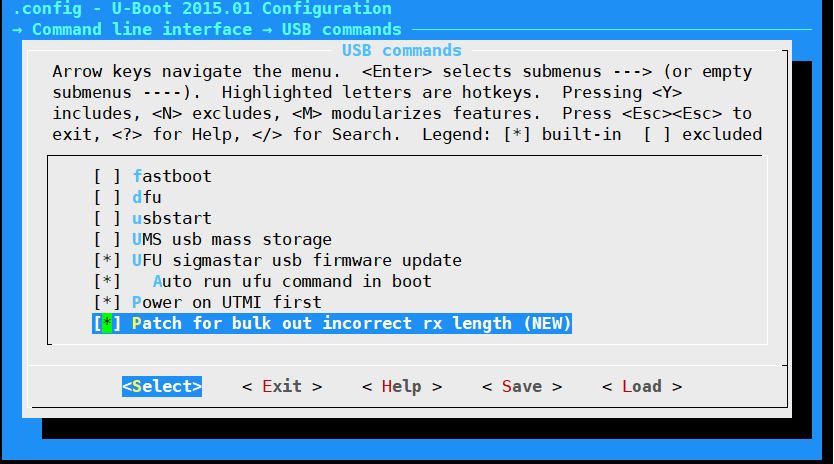
4.1. Kernel Config
There are two ways to increase the uvc config on the basis of the existing config:
-
Modify the default config of the current platform directly. (recommend)
Add the following config:
CONFIG_MEDIA_SUPPORT=m
CONFIG_MEDIA_CAMERA_SUPPORT=y
CONFIG_MEDIA_CONTROLLER=y
CONFIG_VIDEO_DEV=m
CONFIG_VIDEO_V4L2=m
CONFIG_VIDEOBUF2_CORE=m
CONFIG_VIDEOBUF2_MEMOPS=m
CONFIG_VIDEOBUF2_VMALLOC=m
CONFIG_MEDIA_SUBDRV_AUTOSELECT=y
CONFIG_USB_GADGET=m
CONFIG_USB_GADGET_VBUS_DRAW=2
CONFIG_USB_GADGET_STORAGE_NUM_BUFFERS=2
CONFIG_USB_GADGET_SSTAR_DEVICE=m
CONFIG_USB_AVOID_SHORT_PACKET_IN_BULK_OUT_WITH_DMA_FOR_ETHERNET=y
CONFIG_USB_LIBCOMPOSITE=m
CONFIG_SS_GADGET=m
CONFIG_USB_F_UVC=m
CONFIG_USB_G_WEBCAM=m
CONFIG_USB_WEBCAM_UVC=y
CONFIG_MULTI_STREAM_FUNC_NUM=1
-
Use the default config of the current platform
make pioneer3_xxxx_defconfigAdd: make menuconfig
- media framework config
-> Device Drivers
    -> Multimedia support

-> Device Drivers
    -> Multimedia support
        -> Cameras/video grabbers support

-> Device Drivers
    -> Multimedia support
        -> Media Controller API
Output module: media.ko videodev.ko v4l2-common.ko
- media framework config
-
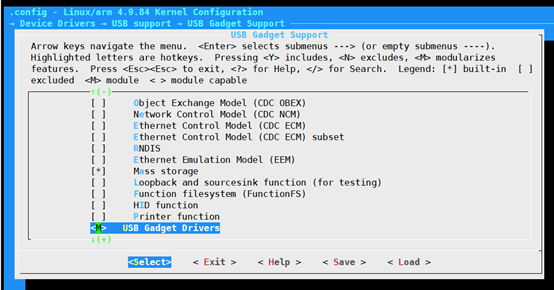
usb Gadget framework config
    -> Device Drivers
        -> USB support

    -> Device Drivers
        -> USB support
            -> USB Gadget Support

Output module: usb-common.ko udc-core.ko
-
udc driver config
HW ip module, which can be configured according to the specific situation.
-> Device Drivers
    -> USB support
        -> USB Gadget Support
            -> USB Peripheral Controller
                -> Sstar USB 2.0 Device Controller
Output module: udc-msb250x.ko
-
-
gadget webcam
    -> Device Drivers
        -> USB support
            -> USB Gadget Support
                -> USB Gadget Drivers

    -> Device Drivers
        -> USB support
        -> USB Gadget Support
            -> USB Gadget Drivers
                -> USB Webcam Gadget

    -> Device Drivers
        -> USB support
            -> USB Gadget Support
                -> USB Peripheral Controller
                    -> Sstar USB 2.0 Device Controller
                        -> Avoid short packet in bulk out with DMA for ethernet

Output module: libcomposite.ko、 videobuf2-core.ko、 videobuf2-v4l2.ko、 videobuf2-memops.ko、 videobuf2-vmalloc.ko 、usb_f_uvc.ko g_webcam.ko
Project config:
Because there is no UVC related config added, the following two files need to be manually modified when compiling uvc function:
-
If you use the default config in kernel config, you need to modify project/makefile, comment out
$(MAKE)linux-kernelin the image target to avoid recompiling the kernel to overwrite the previously manually compiled one; -
Modify project/kbuild/customize/4.9.84/p3/dispcam/kernel_mod_list_late
media.ko
videodev.ko
v4l2-common.ko
usb-common.ko
#usbcore.ko
#ehci-hcd.ko
#scsi_mod.ko
#usb-storage.ko
videobuf2-core.ko
videobuf2-v4l2.ko
videobuf2-memops.ko
videobuf2-vmalloc.ko
udc-core.ko
libcomposite.ko
usb_f_uvc.ko
udc-msb250x.ko
g_webcam.ko streaming_maxpacket=3072 streaming_maxburst=13 uac_function_enable=0
4.2. Application
Please refer to myuvc_remove_media.zip for source code.
Application compilation (omitted)
Execute mi_uvc
Code:
case UVC_SET_CUR:
    if (cfg->bCmdCap & CAP_SET_CUR_CMD) {
        UVC_INFO("/etc/fw_setenv ota_upgrade_status 1\n");
        system("/etc/fw_setenv ota_upgrade_status 1");
       system("sleep 1");
        system("reboot");
        if (cfg->bInfoCap & INFO_AUTO_MODE_SUPPORT) {

        }
    }
    else {
        goto invalid_req;
    }
Process:
Compile the kernel, then execute application after updating the image.
After connecting usb of the pc, execute USBDownloadTool.exe. When the board receives the cmd of uvc, it will reset env and automatically restart to enter the uboot upgrade mode.
Click "upgrade firmware" to enter the upgrade state.
5. USB Device Upgrade in Kernel Mode (USB Mode)
-
Scene
When it is not in uvc mode. Such as USB mode.
-
Principle
By default, USBDownloadTool first detects whether the device is uvc, if it is, it uses uvc mode; if not, it uses the extended upgrade. To support extended upgrades, USBDownloadTool sends a setup command by EP0 to replace the XU command, and notifies the board to upgrade. (Note: The special setup command has been added to the usb gadget driver, update to the corresponding version to upgrade.
composite.chas been updated) -
Requirement
0: uboot supports ufu upgrade.
1: USB mode is supported by Kernel
2: USBDownloadTool upgraded to V2.1.
-
Config
-
uboot config, refer to USB Device Upgrade in Uboot Mode
-
usb device mass storage function is supported by kernel
-
-
Driver config
-
usb Gadget framework config
-> Device Drivers
    -> USB support

-> Device Drivers
    -> USB support
        -> USB Gadget Support
Output module: usb-common.ko udc-core.ko
-
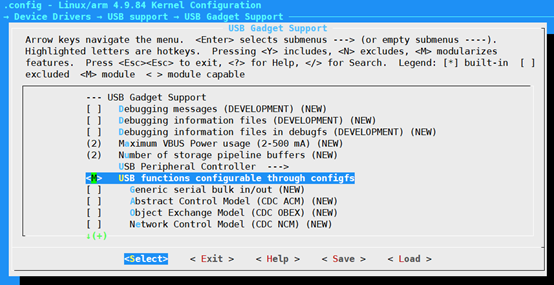
Configure to support configfs
-> Device Drivers
    -> USB Gadget Support
        -> USB functions configurable through configfs
If configured as a module, you need to install the corresponding driver: libcomposite.ko
-
ip related driver
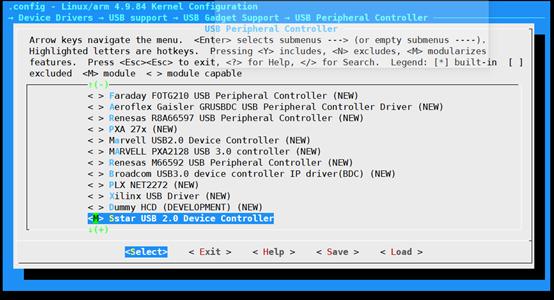
Such as: USB device2.0 driver
-> Device Drivers
    -> USB support
    -> USB Gadget Support
        -> USB Peripheral Controller
        -> Sstar USB 2.0 Device Controller
Generated driver: udc-msb250x.ko
-
usb function related driver
Configure sub-option: (need to deal with the dependency problem of function)
-> Device Drivers
    -> USB support
    -> USB Gadget Support
        -> USB functions configurable through configfs
-
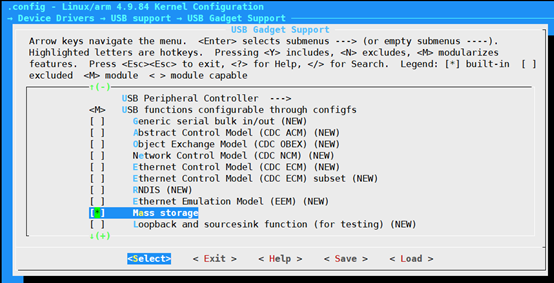
mass storage
-> Device Drivers
    -> USB support -> USB Gadget Support -> USB Gadget Drivers -> Mass Storage Gadget generated driver: usb_f_mass_storage.ko
-
insmod ko
Modify project/kbuild/customize/4.9.84/p3/dispcam/kernel_mod_list_late:
usb-common.ko
udc-core.ko
libcomposite.ko
udc-msb250x.ko
usb_f_mass_storage.ko
Process:
-
Update image
-
Confirm to load the above ko files
-
Execute script and configure USB parameters
Create file: dd if=/dev/zero of=/customer/disk.img bs=1M count=20
./usb_storage.sh -
Execute upgrade script
./fwupdated & -
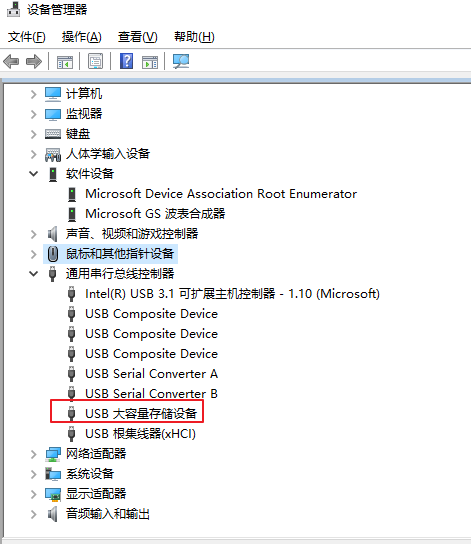
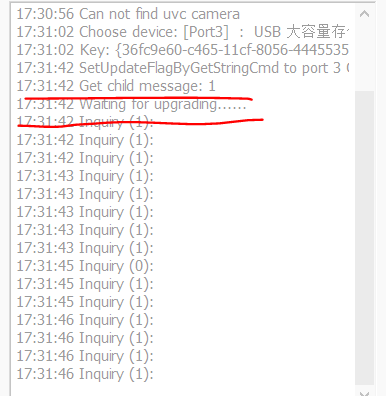
Execute USBDownloadTool 2.1.exe
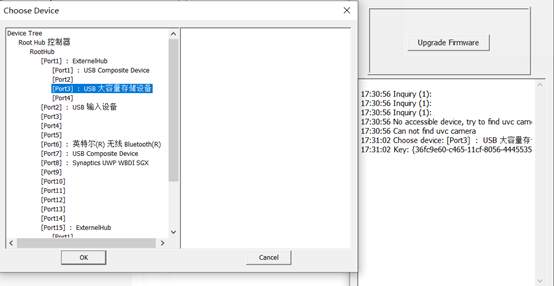
-
Select the storage device and click ok. The upgrade process will be shown in the figure, and it can also be observed by the serial port
-
Related configuration and image test reference images-usbotg-storage.7z
-
6. Note
Note for unabled upgrade:
-
Make sure that the blank chip can also be upgraded normally, if not, check the hardware.
-
Make sure that the upgrade can be completed in uboot. If not, check the hardware and uboot config.
-
In the kernel mode, you can normally receive the upgrade command of the uvc tool (you can restart to enter the uboot upgrade mode). Make sure mi_uvc is executed
-
If more than one uvc device is detected on the pc, please disable the camera device.
Provide myuvc_remove_media.zip and images-usbotg-storage.7z for reference.